How to Build a Rain Gutter Garden for Small Spaces
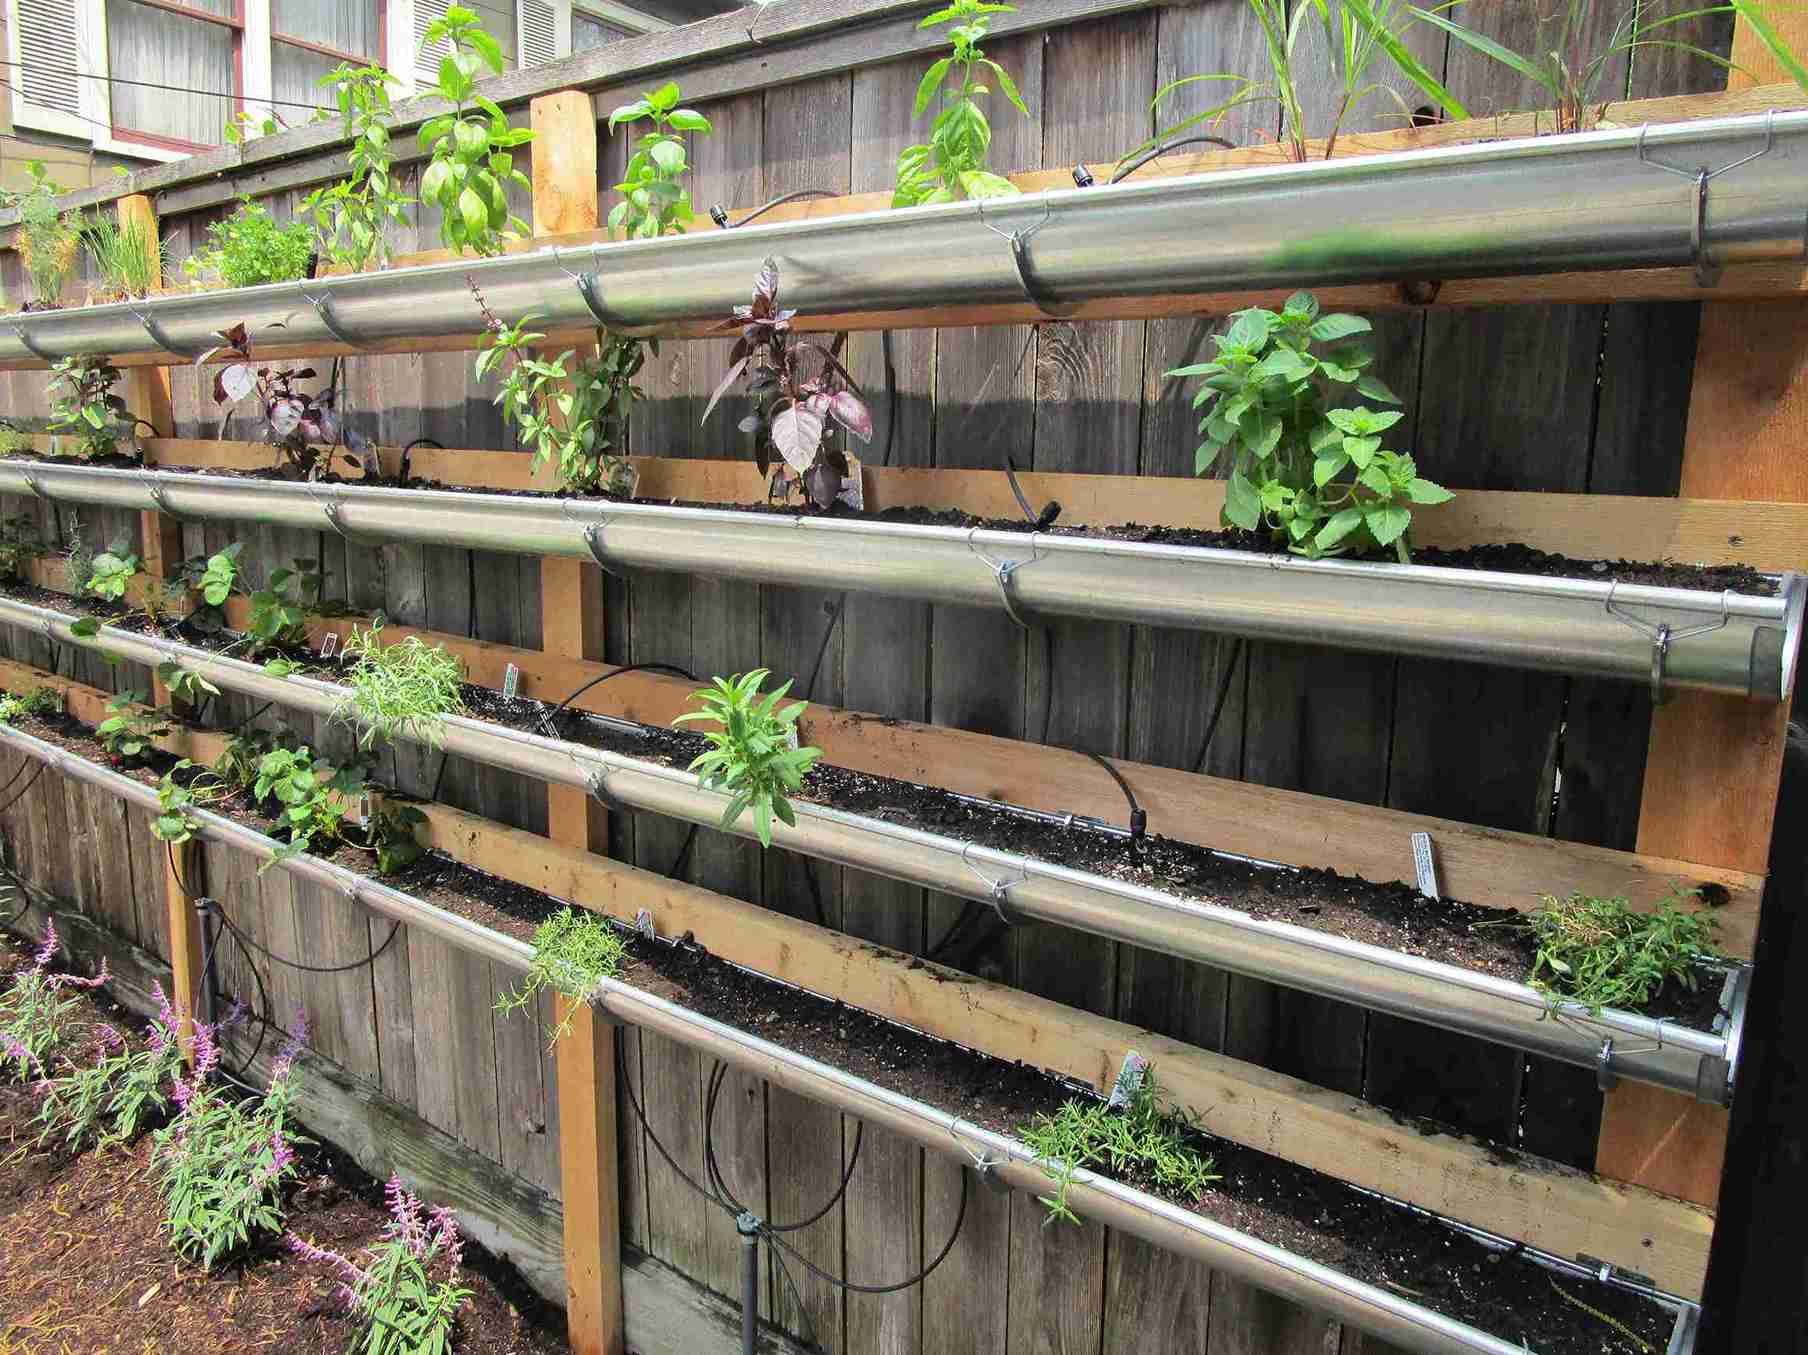
Want to grow fresh herbs and vegetables but don’t have much space? You don’t need a large backyard to enjoy homegrown food. A few rain gutters and basic tools are enough to create a productive garden on a fence, wall, balcony, or deck railing.
A DIY rain gutter garden is an affordable way to make use of unused vertical space. It’s perfect for growing herbs, leafy greens, and strawberries, even in small outdoor areas.
In this guide, you’ll learn how to build a rain gutter garden, choose the best location and plants, install it correctly, and keep it growing with simple watering and maintenance tips.
Whether you’re a beginner or looking to upgrade your setup, you’ll have everything you need to build a thriving vertical rain gutter garden.
Materials You’ll Need
You only need a few basic materials to build a rain gutter garden. Most are easy to find at any home improvement store.
Rain Gutters
PVC and vinyl gutters are the best choices because they’re lightweight, affordable, and easy to cut. Metal gutters also work but are heavier and may rust over time.
Choose gutters that are at least 5 inches wide to give plant roots enough space.
End Caps
End caps close both ends of the gutter and keep the soil inside. Buy caps that match your gutter size.
Mounting Brackets
Use sturdy brackets made for your gutter style. Install enough brackets to support the weight of wet soil and plants.
Downspout Pieces (Optional)
Downspouts can direct excess water from one gutter to another if you’re building multiple rows.
Chains or Wire
For a hanging garden, use galvanized chain or heavy duty wire that can safely support the gutters.
Screws and Wall Anchors
Choose screws that match your mounting surface. Use wood screws for wooden fences and masonry anchors for brick or concrete walls.
Basic Tools
You’ll need:
- Tape measure
- Pencil or marker
- Cordless drill
- Drill bits
- Level
- PVC cutter or hacksaw
- Screwdriver
- Safety glasses
- Work gloves
Potting Mix
Fill the gutters with a lightweight potting mix instead of garden soil. It drains better and prevents soil from becoming compacted.
Landscape Fabric (Optional)
Place landscape fabric inside the gutter to help keep the potting mix from washing out while allowing water to drain.
Slow Release Fertilizer
Mix a slow release fertilizer into the potting mix before planting. Since gutter gardens hold less soil, nutrients run out faster than in traditional garden beds.
Approximate Material Costs
| Material | Estimated Cost (USD) |
|---|---|
| 10 foot PVC gutter | $10 to $18 |
| Two end caps | $3 to $6 |
| Mounting brackets | $8 to $15 |
| Potting mix | $8 to $15 |
| Screws and anchors | $5 to $10 |
| Slow release fertilizer | $8 to $15 |
A basic rain gutter garden usually costs $45 to $80, depending on the size and materials you choose.
Pro Tip: Buy one extra gutter and a few extra end caps. They are inexpensive and make future repairs or expansions much easier.
Choose the Best Location
Where you install your rain gutter garden matters just as much as how you build it. Even the healthiest plants struggle if they don’t receive enough sunlight or proper drainage. Spend a little time choosing the right location before picking up your drill.
Look for Plenty of Sunlight
Most vegetables and herbs need several hours of direct sunlight each day. Watch the area for a full day to see how the sun moves across it.
Here is a simple guide:
| Plant Type | Daily Sunlight |
|---|---|
| Leafy greens | 4 to 6 hours |
| Strawberries | 6 to 8 hours |
| Herbs | 6 or more hours |
If your space receives afternoon shade, grow lettuce, spinach, and other leafy greens there. Save the brightest spots for herbs and strawberries.
Best Plants for a Rain Gutter Garden
Rain gutter gardens work best with crops that have shallow root systems. Since the soil depth is limited, choose plants that stay compact and mature quickly. Large vegetables usually become root bound and produce poor harvests.
Herbs
Herbs are among the easiest plants to grow in a rain gutter garden. Most have shallow roots and grow well in containers.
Good choices include:
- Basil
- Parsley
- Chives
- Cilantro
- Dill
- Thyme
- Oregano
Mint also grows well, but plant it in its own gutter. It spreads quickly and can crowd out nearby herbs.
Fresh herbs are easy to harvest throughout the season, making them one of the biggest rewards of a gutter garden.
Leafy Greens
Leafy vegetables thrive because they don’t require deep soil.
Excellent options include:
- Loose leaf lettuce
- Spinach
- Arugula
- Baby kale
- Mustard greens
- Swiss chard (baby leaves)
Harvest the outer leaves first while allowing the center to continue growing. This gives you fresh greens for weeks from the same plants.
Strawberries
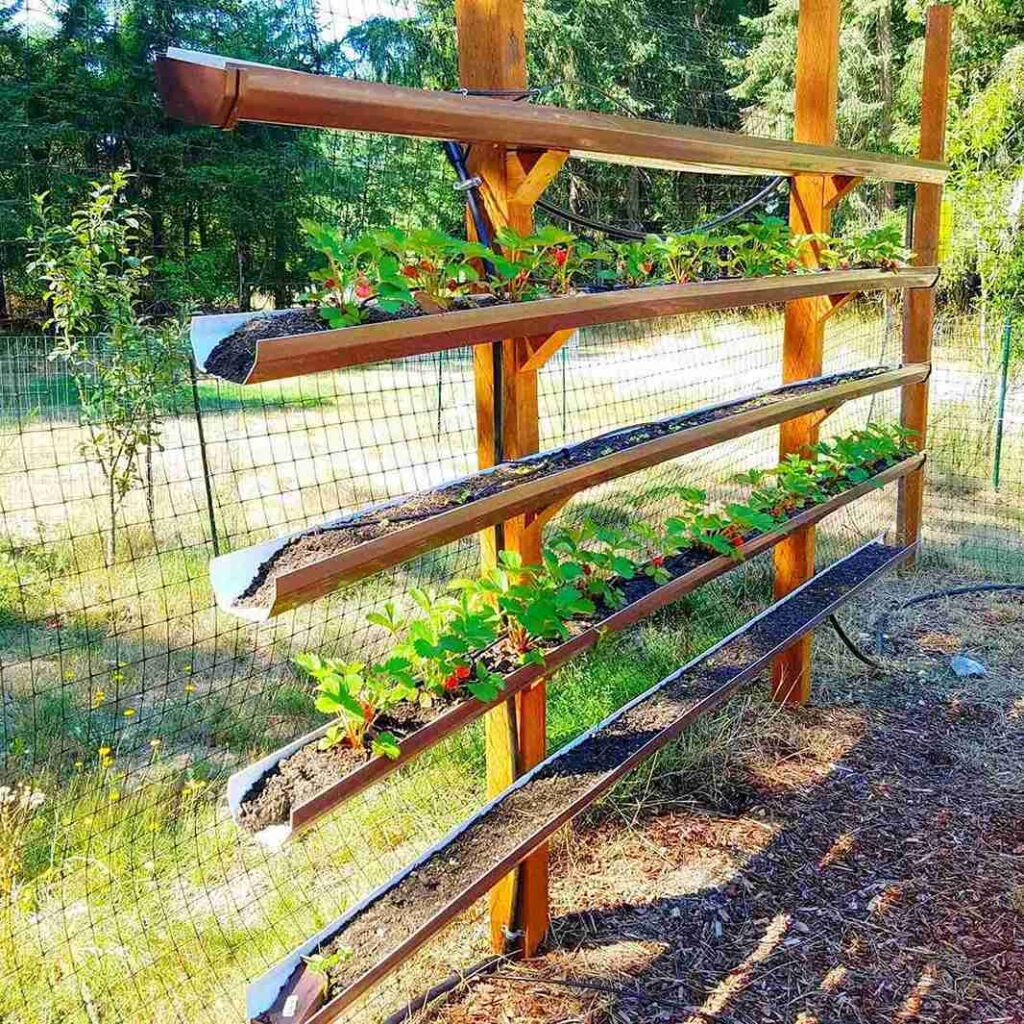
Strawberries are one of the most popular choices for rain gutter gardening. Hanging fruit stays cleaner than fruit grown on the ground, and the plants receive better airflow, which helps reduce moisture around the leaves.
Plant day-neutral or everbearing varieties if you want fruit throughout the growing season.
Edible Flowers
Flowers bring color while attracting helpful pollinators.
Good options include:
- Nasturtiums
- Alyssum
- Pansies
- Violas
- Calendula
Many of these flowers are edible and can be added to fresh salads.
Plants to Avoid
Some vegetables simply need more space than gutters can provide.
Avoid planting:
- Tomatoes
- Corn
- Bell peppers
- Potatoes
- Large squash
- Pumpkins
- Cucumbers
- Broccoli
- Cauliflower
These plants develop large root systems and become too heavy for shallow gutters.
If you want to grow these vegetables, raised beds or large containers are a much better choice.
Quick Win: Start with basil, parsley, loose leaf lettuce, spinach, and strawberries. These plants are reliable, easy for beginners, and produce well in shallow containers.
Step by Step: How to Build a Rain Gutter Garden
Building a rain gutter garden is easier than many people expect. The project can usually be finished in a few hours using basic tools. Take your time with each step. A strong frame and good drainage will help your plants stay healthy for years.
Step 1: Measure the Installation Area
Start by deciding where the garden will go. Measure the width and height of the wall, fence, or railing. Think about how many rows you want to install and leave enough room between them.
A spacing of 10 to 14 inches between gutters gives most herbs and leafy greens enough room to grow without blocking sunlight.
Before moving on, use a pencil to mark where each bracket will be installed.
Why This Matters: Careful planning helps prevent crowded rows and makes watering and harvesting much easier.
Step 2: Cut the Gutters
Measure each gutter based on your available space. Use a PVC cutter or hacksaw to make clean, straight cuts.
Smooth any rough edges with sandpaper so the end caps fit tightly.
If you’re creating several rows, cut all the gutters before moving to the next step.
Step 3: Attach the End Caps
Install an end cap on both ends of every gutter.
Some end caps snap into place, while others need waterproof adhesive. Follow the manufacturer’s instructions for the best seal.
Check that each cap fits tightly before adding soil.
Step 4: Drill Drainage Holes
Drainage is one of the most important parts of the project.
Without drainage holes, water collects inside the gutter. Wet soil stays soggy, roots begin to rot, and plants often die.
Drill holes along the bottom of each gutter.
A good guideline is:
- Small gutters: one hole every 6 inches
- Longer gutters: one hole every 8 to 12 inches
Each hole should be about 1/4 inch wide.
If you want to keep soil from washing out, place a strip of landscape fabric inside before adding potting mix.
Beginner Tip: It is always better to have slightly more drainage than too little.
Step 5: Install the Brackets
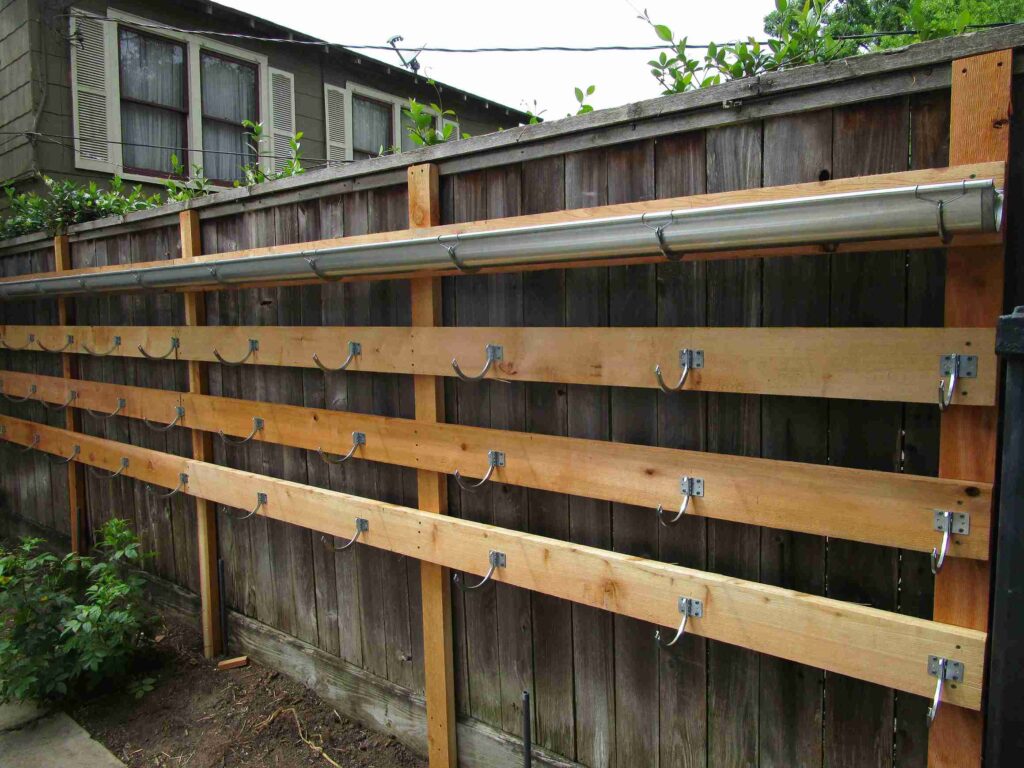
Hold the brackets against the wall or fence using your layout marks.
Use a level before driving in the screws. Even a small tilt can cause water to collect at one end.
Install enough brackets to support the full weight of wet soil and mature plants.
For most 10-foot gutters, three brackets provide good support. Longer sections may need an extra bracket in the middle.
Step 6: Mount the Gutters
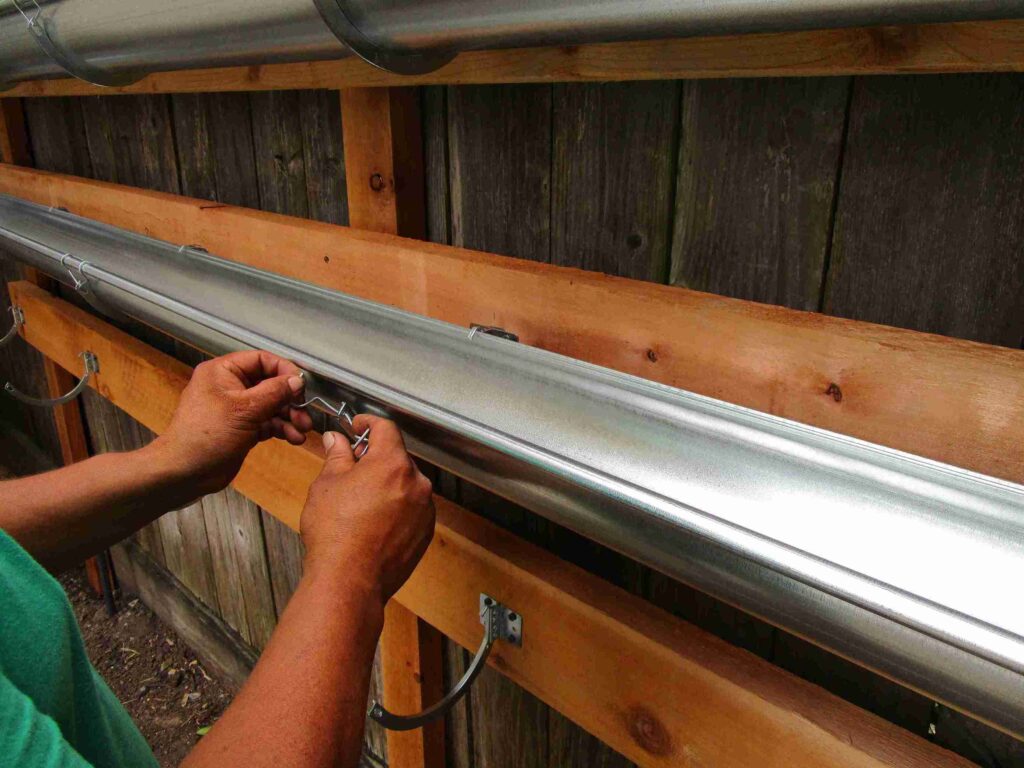
Place each gutter into the brackets.
Leave a slight slope toward one end. About 1/4 inch for every 8 to 10 feet helps excess water drain naturally without washing away the soil.
Once installed, gently pull on each gutter to make sure everything feels secure.
If anything moves, tighten the brackets before continuing.
Step 7: Fill With Potting Mix
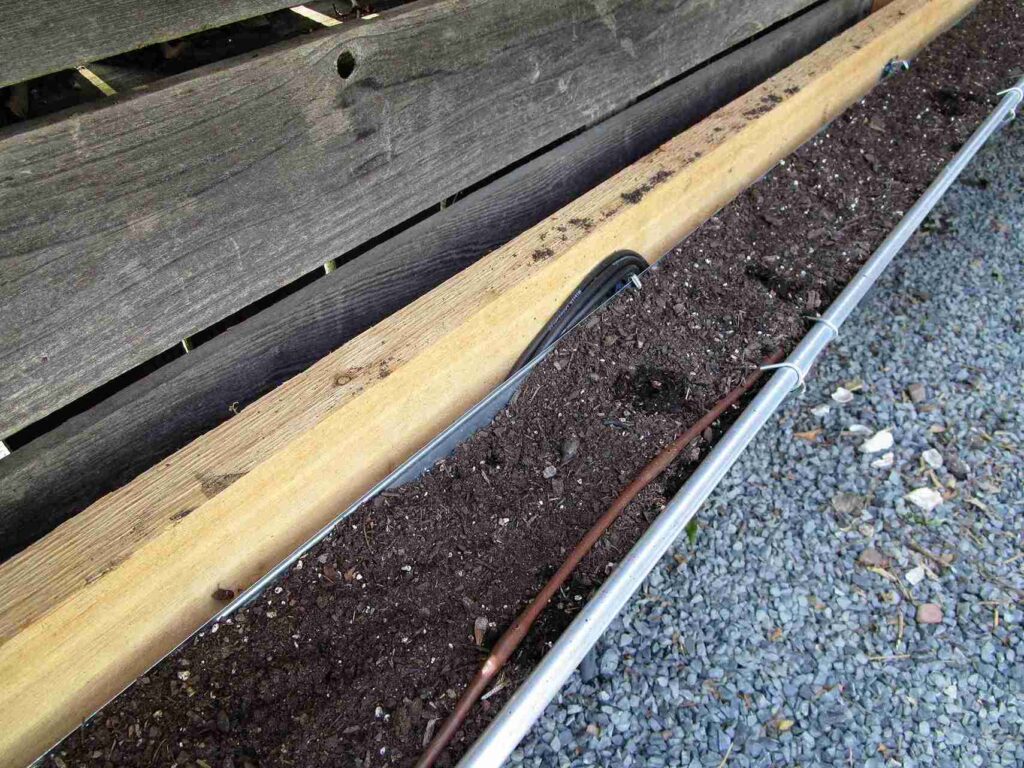
Choose a lightweight potting mix instead of garden soil.
Garden soil becomes heavy and compact in shallow containers. Potting mix stays loose, drains better, and allows roots to breathe.
Fill each gutter until it is about one inch below the top edge.
Mix in a slow-release fertilizer if your potting mix doesn’t already contain nutrients.
Step 8: Plant Your Crops
Now it’s time to plant.
Arrange plants according to their mature size instead of squeezing in as many as possible.
For example:
- Lettuce: about 6 inches apart
- Basil: 8 to 10 inches apart
- Parsley: 6 to 8 inches apart
- Strawberries: 8 to 10 inches apart
After planting, gently press the soil around each root ball.
Avoid packing the soil too tightly.
Step 9: Water Thoroughly
Give the entire system a deep watering after planting.
Water slowly so the potting mix becomes evenly moist.
Check that water flows through the drainage holes instead of pooling inside the gutters.
The soil should feel damp but never muddy.
Step 10: Test the Drainage
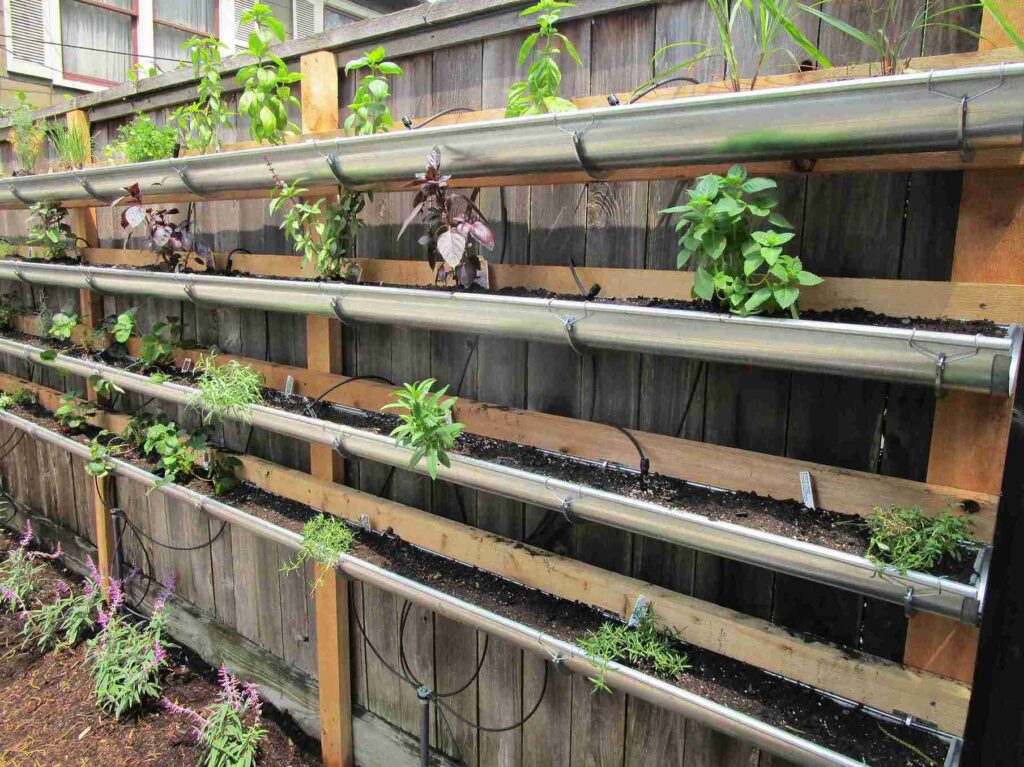
After watering, inspect every gutter.
Look for:
- Standing water
- Leaking end caps
- Loose brackets
- Soil washing out
- Overflowing gutters
Fix any small problems now before the plants become established.
Once everything drains properly, your rain gutter garden is ready to grow.
Quick Win: Label each gutter with the plant name and planting date. This makes harvesting and future planting much easier.
Watering and Fertilizing
Because rain gutter gardens hold less soil than traditional beds, they dry out faster. A regular watering routine is one of the biggest keys to success.
Watering Frequency
There isn’t one schedule that works for every garden.
Check the soil with your finger before watering. If the top inch feels dry, it’s time to add water.
As a general guide:
- Spring: every 2 to 3 days
- Summer: once a day during hot weather
- Fall: every 3 to 5 days, depending on rainfall
Containers in full sun may need extra watering during heat waves.
Hand Watering
A watering can works well for small gardens.
Water slowly along the entire gutter instead of pouring everything in one spot. This keeps the soil evenly moist.
Drip Irrigation
If you have several gutters, consider installing a simple drip irrigation system.
A drip line delivers water directly to the soil while reducing waste. It also saves time during the hottest months.
Rainwater Collection
A rain barrel can supply free water for your garden.
Collected rainwater is often a good choice for container plants because it doesn’t contain chlorine or other treatment chemicals found in some municipal water supplies.
Fertilizing
Plants use nutrients quickly in shallow containers.
Feed them every 2 to 4 weeks with a diluted liquid fertilizer during active growth.
Another option is compost tea, which provides gentle nutrients while supporting healthy soil.
Avoid adding more fertilizer than recommended. Too much fertilizer encourages leafy growth but can reduce harvest quality in some crops.
Why This Matters: Healthy watering habits prevent many common problems before they start, including wilting, root rot, and poor growth.
Maintenance Throughout the Season
A rain gutter garden doesn’t require much work, but small tasks each week keep it growing well.
Weekly Checklist
Spend a few minutes checking your garden every week.
Look for:
- Dry soil
- Yellow leaves
- Weeds
- Insect damage
- Loose brackets
- Blocked drainage holes
Remove dead leaves as soon as you notice them. This improves airflow around the plants.
Monthly Maintenance
Once a month, inspect the entire system.
Check that:
- All screws remain tight
- Gutters stay level
- End caps are secure
- Drainage holes are open
- Plants have enough space
Trim herbs often to encourage fresh growth.
Harvest leafy greens regularly instead of letting them become oversized.
Seasonal Cleaning
After the growing season ends, remove all plants and empty the old potting mix.
Wash each gutter with warm water and a soft brush to remove dirt, algae, and leftover roots.
Avoid harsh chemicals that could remain on the surface.
Allow everything to dry completely before storing or replanting.
Replace Potting Mix
Potting mix loses nutrients over time.
Replace most or all of it before planting a new crop. Fresh mix provides better drainage for roots and improves plant health.
Winter Care
If you live in an area with cold winters, protect your gutters from damage.
You can:
- Remove hanging gutters and store them indoors
- Empty the soil before freezing weather
- Cover fixed systems if removal isn’t practical
Taking a little time to prepare for winter helps extend the life of your garden.
Quick Win: Keep a small notebook or phone reminder for watering, fertilizing, and harvesting dates. It makes seasonal care much easier.
Conclusion
A rain gutter garden is an affordable way to grow fresh herbs, leafy greens, and strawberries in a small space. With the right location, good drainage, and lightweight potting mix, you can build a garden that’s easy to maintain and productive throughout the growing season.
If you’re just getting started, begin with one or two gutters and easy plants like basil, lettuce, or spinach. You can always expand your system as your garden grows.
Now that you know how to build a rain gutter garden, it’s time to put your plan into action and turn a fence, wall, or balcony into a thriving vertical garden.